
Amazon EC2 is usually the largest line on an AWS invoice, which makes it the first place to look for savings. Reports on cloud waste, such as the annual Flexera State of the Cloud Report 2026, estimate that roughly 29% percent of cloud spend is wasted, and idle or oversized compute is a major part of it. You can remove much of that waste without changing how your applications behave, as long as you follow an order: measure first, change second, verify third.
This guide covers nine tactics, from lowest risk to highest effort, with commands you can run today. Three of them have their own detailed guides, which are linked where they come up.
1. Establish a Baseline Before Changing Anything
Most performance incidents after a rightsizing happen because someone resized on a hunch. Before touching anything, collect at least 14 days of utilization data, or 30 days if you have monthly batch jobs.
Turn on three native tools:
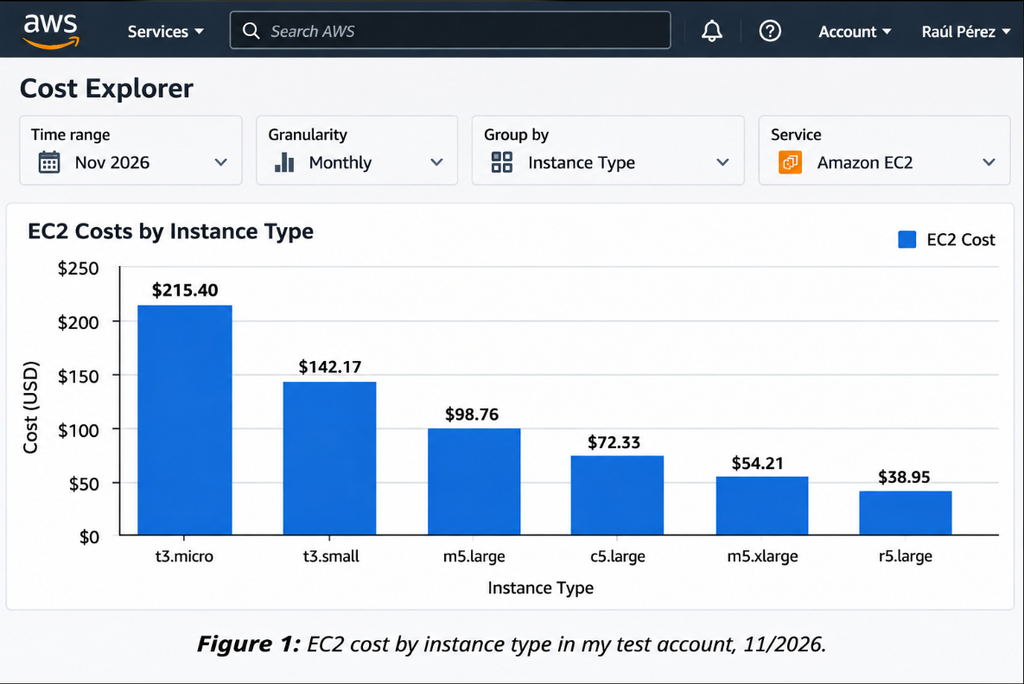
- AWS Cost Explorer to see which instance families and accounts drive spend.
- AWS Compute Optimizer for rightsizing recommendations.
- Amazon CloudWatch for CPU and network, plus memory and disk with the CloudWatch agent.
One caveat matters more than the rest: CloudWatch does not report memory by default. If you rightsize on CPU alone, you can shrink a memory-bound database or JVM service and cause out-of-memory crashes. Install the CloudWatch agent first.
Pull the average and peak CPU of one instance over 14 days (the date -d syntax below works on Linux; on macOS use date -v-14d):
aws cloudwatch get-metric-statistics \
  --namespace AWS/EC2 \
  --metric-name CPUUtilization \
  --dimensions Name=InstanceId,Value=i-0abcd1234efgh5678 \
  --start-time $(date -u -d '14 days ago' +%Y-%m-%dT%H:%M:%SZ) \
  --end-time $(date -u +%Y-%m-%dT%H:%M:%SZ) \
  --period 3600 \
  --statistics Average Maximum
Also record application indicators such as p95 latency, error rate and throughput. They are your performance contract: if they stay flat after a change, the change was safe.
2. Remove Idle and Orphaned Resources
This is the safest saving, because the resources do nothing. Typical offenders are stopped instances still paying for their disks, unattached EBS volumes, forgotten snapshots and AMIs, idle load balancers and NAT gateways, and unused Elastic IPs. Since February 2024 AWS charges for every public IPv4 address, whether attached or not (AWS VPC pricing).
List Elastic IPs that are not associated with anything:
aws ec2 describe-addresses \
  --query 'Addresses[?AssociationId==`null`].{IP:PublicIp,Alloc:AllocationId}' \
  --output table
For the full cleanup routine, including volumes and snapshots, see our runbook for unattached EBS volumes and idle IPs. The one rule to keep in mind here: never delete straight away. Snapshot, tag with a deletion date, and wait one or two weeks.
3. Rightsize Overprovisioned Instances
Rightsizing means matching instance size to real demand. After commitments it is usually the biggest lever, and the one that causes most incidents, so take it step by step.
| Observed pattern (14 to 30 days) | Suggested action |
|---|---|
| Max CPU under 40% and memory under 50% | Downsize one step (for example m6i.2xlarge to m6i.xlarge) |
| Low CPU, high memory | Move to a memory-optimized family (r) at a smaller size |
| High CPU, low memory | Move to a compute-optimized family (c) |
| Spiky CPU with a low average | Test burstable (t3 or t4g) and monitor credits |
| Sustained CPU above 80% | Do not downsize; consider scaling out or up |
Ask Compute Optimizer what it recommends (it needs enough metric history first, which can take a day or more after you opt in):
aws compute-optimizer update-enrollment-status --status Active

aws compute-optimizer get-ec2-instance-recommendations \
  --query 'instanceRecommendations[*].{Instance:instanceArn,Finding:finding,Current:currentInstanceType,Option:recommendationOptions[0].instanceType}' \
  --output table
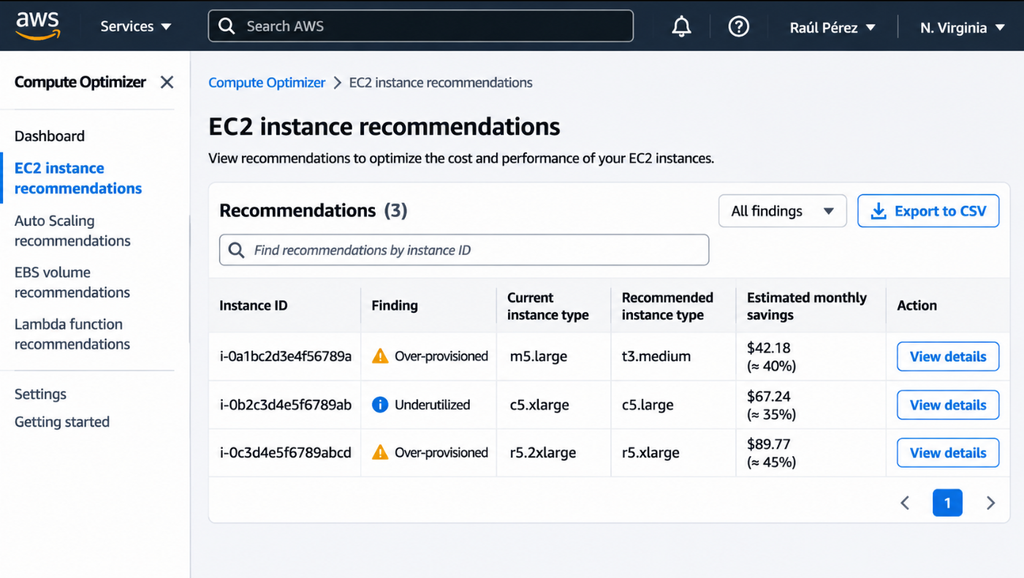
AWS Compute Optimizer identified some EC2 instances that were potentially over-provisioned and recommended switching to smaller instance types to reduce costs. I reviewed the recommendations and considered changing the instance types to more cost-effective options while maintaining performance. One recommendation I decided not to follow was downsizing an instance because I wanted to avoid potential performance issues during periods of high demand.
Resize safely:
- Change one step at a time. Jumping from
4xlargetolargeis how outages start. - Start in non-production, then a canary slice of production.
- Watch latency and errors for at least 48 hours, including a peak.
- Write down the previous instance type so rollback takes minutes.
For stateless fleets behind an Auto Scaling group, change the launch template and let an instance refresh roll the change gradually. You get zero-downtime rollback for free.
4. Move to Newer Generations and Graviton
Newer generations usually offer better price-performance at the same or lower hourly price, so moving from m5 to m6i or m7i can be a free upgrade. The bigger step is AWS Graviton (m7g, c7g, r7g). AWS states that Graviton-based instances deliver up to 40 percent better price-performance than comparable x86 instances (AWS Graviton, checked 11/2026). Real results depend on your workload, so benchmark your own application.
Graviton suits web and API servers, containerized services, open-source databases and CI/CD agents. First confirm that your stack supports arm64. For containers, build multi-architecture images:
docker buildx build \
  --platform linux/amd64,linux/arm64 \
  -t myrepo/myapp:latest --push .
Run a Graviton canary beside your x86 fleet and compare p95 latency and cost per 1,000 requests before moving traffic.
5. Commit Smartly with Savings Plans and Reserved Instances
On-Demand is the most expensive way to run steady workloads. AWS publishes discounts of up to 66 percent for Compute Savings Plans and up to 72 percent for EC2 Instance Savings Plans and Standard Reserved Instances (3-year, all upfront; Savings Plans documentation, checked 11/2026). Your own discount depends on term, payment option and instance type.
The golden rule is rightsize first, commit second. If you commit to oversized instances you lock waste in for one to three years. Commit only to your stable baseline, often a share of your lowest consistent usage, and leave the rest On-Demand or Spot.
Get purchase recommendations based on your own usage:
aws ce get-savings-plans-purchase-recommendation \
  --savings-plans-type COMPUTE_SP \
  --term-in-years ONE_YEAR \
  --payment-option NO_UPFRONT \
  --lookback-period-in-days THIRTY_DAYS
For a decision framework and break-even math, see Reserved Instances vs Savings Plans.
6. Use Spot Instances for Fault-Tolerant Workloads
Spot Instances use spare capacity at discounts of up to 90 percent compared with On-Demand (EC2 Spot). AWS can reclaim them with a two-minute warning, so they suit batch jobs, CI runners, stateless web tiers and Kubernetes workers, not single-node databases.
Diversify instance types so the group can draw from many capacity pools. A mixed instances policy for an Auto Scaling group looks like this:
{
  "MixedInstancesPolicy": {
    "LaunchTemplate": {
      "LaunchTemplateSpecification": {
        "LaunchTemplateName": "my-template",
        "Version": "$Latest"
      },
      "Overrides": [
        {"InstanceType": "m6i.large"},
        {"InstanceType": "m6a.large"},
        {"InstanceType": "m7i.large"},
        {"InstanceType": "m7g.large"}
      ]
    },
    "InstancesDistribution": {
      "OnDemandBaseCapacity": 2,
      "OnDemandPercentageAboveBaseCapacity": 20,
      "SpotAllocationStrategy": "price-capacity-optimized"
    }
  }
}
This keeps a small On-Demand base and fills the rest with the cheapest, least-interrupted Spot pools. Also handle the interruption notice by draining connections and finishing in-flight work. If you run Kubernetes, see Spot Instances for Kubernetes.
7. Schedule Non-Production Environments
A work week is about 50 hours out of 168, so an always-on dev instance is idle roughly 70 percent of the time. Stopping non-production environments at night and on weekends cuts their compute cost by about two thirds, without touching production. EventBridge Scheduler can stop and start tagged instances on a timer, and AWS offers the Instance Scheduler on AWS solution as a ready-made option. Our step-by-step scheduling guide shows both. Remember that stopped instances still pay for their EBS volumes.
8. Optimize EBS Storage and Data Transfer
Storage and networking are the hidden part of an EC2 bill. The easiest storage win is moving gp2 volumes to gp3, which AWS prices up to 20 percent lower per GB and which lets you set IOPS and throughput independently. The conversion is online, with no detach and no downtime:
aws ec2 modify-volume --volume-id vol-0abc1234def567890 --volume-type gp3Other wins: delete old snapshots with lifecycle policies (Amazon Data Lifecycle Manager), shrink oversized volumes, and avoid high-IOPS io1 or io2 unless a database truly needs them. On the network side, keep chatty services in the same Availability Zone when resilience allows, use VPC endpoints (the S3 and DynamoDB gateway endpoints are free) to avoid NAT gateway processing fees, and put CloudFront in front of public content.
9. Build Guardrails So Costs Stay Low
Without guardrails, waste creeps back within months.
- Enforce tags (
Owner,Environment,Project,CostCenter) with AWS Organizations tag policies. - Set AWS Budgets and Cost Anomaly Detection so surprises reach you in hours.
- Review monthly. Re-run Compute Optimizer and your idle-resource checks on a calendar.
- Track unit cost (per customer, transaction or 1,000 requests). Total spend can rise healthily when the business grows; unit cost should fall.
- Shift left. Add cost estimates to pull requests, for example with Infracost and Terraform.
Where to Start in Your Own Account
If I were stepping into a new account, my first move would be identifying unattached EBS volumes and idle Elastic IPs, as deleting unused assets yields instant savings with zero operational risk. I would postpone aggressive compute Right-Sizing until we gather at least a month of CloudWatch metrics to avoid unexpected performance bottlenecks. The biggest trap I’ve seen is locking into rigid 3-year Savings Plans too early, which leaves teams paying for compute capacity they no longer use after architectural shifts.
| Tactic | Risk | Effort | How to check it in your own account |
| Remove idle and orphaned resources | None | Low | List unattached volumes and unassociated Elastic IPs (commands in section 2) and price them |
| Migrate gp2 to gp3 | None | Low | Compare the total GiB of your gp2 volumes with the current gp2 and gp3 price per GiB-month |
| Schedule non-production instances | None | Low | Count the weekly hours your dev instances really need against the 168 hours in a week |
| Savings Plans or RIs | None on performance | Low to Medium | Open the Savings Plans recommendations in Cost Explorer and read the estimated saving |
| Rightsizing compute | Low if stepwise | Medium | Opt in to AWS Compute Optimizer and read its findings once metrics have built up |
| Adopt Graviton processors | Low if benchmarked | Medium | Compare Graviton and x86 hourly prices for your instance family |
| Leverage Spot instances | Medium | Medium to High | Compare the Spot price history of your instance types with On-Demand rates |
A Safe 30-Day Plan
- Week 1: enable Cost Explorer, Compute Optimizer and the CloudWatch agent; clean up orphaned resources; migrate gp2 to gp3.
- Week 2: schedule non-production and tag everything.
- Week 3: rightsize the ten most expensive underused instances, one step at a time, starting outside production.
- Week 4: buy a Compute Savings Plan for your stable baseline; pilot Graviton and Spot on one suitable workload.
Frequently Asked Questions
Will rightsizing slow my application? Not if you decide with at least two weeks of CPU and memory data, change one size at a time and watch latency and errors afterwards. Problems nearly always come from skipping the measurement step.
Should I buy Savings Plans first or optimize first? Optimize first. Cleanup and rightsizing shrink your baseline, and committing afterwards avoids locking in waste.
What is the easiest win? Removing idle resources and scheduling non-production environments. Both carry almost no risk for customers.
Conclusion
Cutting EC2 cost does not require sacrificing performance. It requires an order: measure, clean up, rightsize, modernize, commit and automate. Start with the zero-risk actions, validate each change against your latency and error metrics, and only then add commitments and Spot.
Sources
- AWS Compute Optimizer
- AWS Cost Explorer
- Amazon EC2 pricing
- AWS Savings Plans
- AWS Graviton
- EC2 Spot Instances
- Amazon EBS pricing
- Flexera State of the Cloud Report 2026
Last reviewed: 11/2026. Prices and discounts change often; please confirm current figures on the official AWS pages and in your own Cost Explorer data before making purchasing decisions.I have not run every single command or migration in this guide on production environments myself; where I have performed hands-on tests, it is explicitly stated. All pricing examples are calculated based on public AWS documentation.
About the author. I write about cloud cost optimization and FinOps on SmartCloudSpend. I am a FinOps Architect and former DevOps Engineer with over 3 years of experience managing AWS, Azure, and SaaS infrastructure budgets. I specialize in eliminating cloud waste, rightsizing compute resources, and building cost-aware engineering practices. Through hands-on guides and tool comparisons, I help teams optimize cloud spend without sacrificing performance.